
Desserts
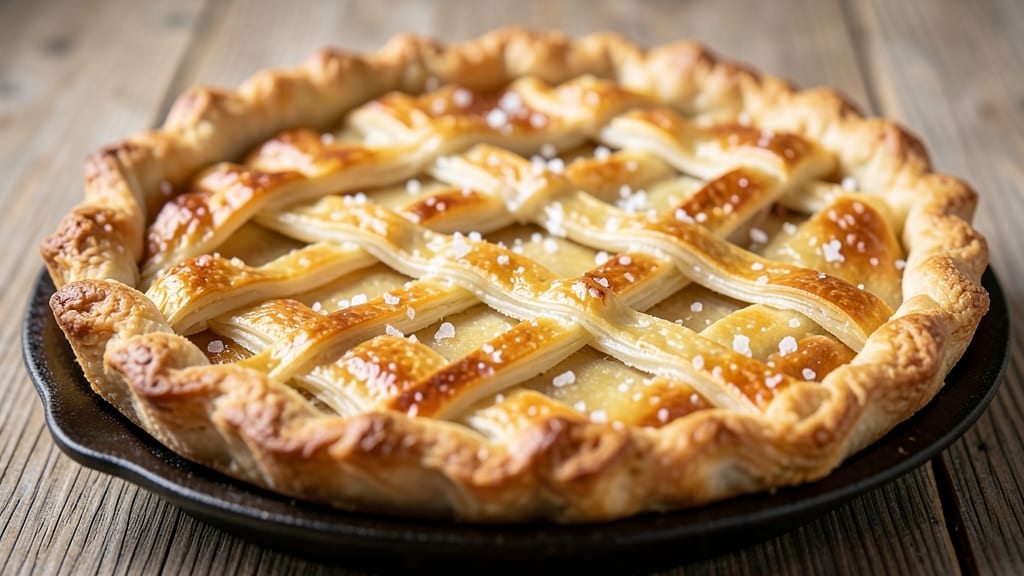
This 9 1/2-inch pie crust recipe delivers the precision and elegance of bakery-quality crusts without the fuss. 💛 The secret lies in the perfect ratio of all-purpose flour, cold butter, and ice water—combined with a technique that ensures a tender, flaky texture every time.
Whether you're making a single-serving tart or a delicate fruit pie, this crust is your foundation for success.
The beauty of this recipe is its simplicity: just six ingredients and minimal effort, yet the results are undeniably professional. Chilling the dough is non-negotiable—it keeps the butter from melting and ensures clean, even layers when rolled.
I’ve perfected this method over years of baking, and it never fails to impress, even with the most delicate fillings.
What you’ll achieve is a perfectly proportioned crust with a crisp, golden edge and a tender crumb—ideal for holding its shape without cracking. The key is patience: letting the dough rest and rolling it gently to maintain even thickness.
This crust is the kind that makes every dessert feel like a showstopper.
Use it for classic apple pies, rich chocolate tarts, or even savory quiches. The versatility is endless, and the results will have you reaching for this recipe time and time again. Let’s get started on creating your flawless crust.
Ingredients for 9 1/2 inch pie crust
Six ingredients, bakery-quality results—this is your perfect pie crust foundation.
| Ingredient | Amount | Notes |
|---|---|---|
| All-Purpose Flour 🌾 | 2 ¼ cups | Sifted for even texture |
| Unsalted Butter 🧈 | 1 cup | Cold, cubed (1/2-inch pieces) |
| Ice Water 💧 | ¼ cup | Freeze in ice cube tray |
| Diamond Crystal Kosher Salt 🧂 | ½ tsp | Fine grain preferred |
| Granulated Sugar 🍚 | 1 tbsp | For golden crust edge |
| White Vinegar 🍶 | 1 tsp | Enhances flakiness |
The butter makes or breaks this crust. European-style unsalted butter (like Plugrá or Kerrygold) has higher fat content for maximum flakiness, but regular unsalted works too. Buy it in 1-pound blocks—it stays colder longer. The key is keeping everything cold: chill your mixing bowl, your hands, even the counter. If your butter starts to soften, pop it back in the fridge for 10 minutes. King Arthur or Bob's Red Mill flour are my go-tos—they're finely milled and consistent, but any all-purpose will work. Sift it first for a lighter texture.
No vinegar? Lemon juice at the same amount works in a pinch. Short on sugar? Skip it entirely—the crust will still be tender, just less golden. The ice water is non-negotiable though—room temperature water will make your crust tough. Freeze it in an ice cube tray ahead of time so you can grab exactly what you need. For a savory crust, omit the sugar and add an extra pinch of salt. The dough should come together just when it stops crumbling—don't overwork it. If it feels too dry, add another teaspoon of ice water.
This dough keeps for 3 days in the fridge, wrapped tightly in plastic. For longer storage, freeze it between parchment paper for up to 3 months. Let it thaw in the fridge overnight before rolling. The secret to perfect handling? Roll it gently between two sheets of parchment, keeping it as round as possible. If you're prepping for a pie, chill the rolled crust for 30 minutes before transferring—this prevents shrinking. The crust can be pre-baked for 15 minutes at 375°F if you're making a custard filling that needs a firm base.
Why You'll Love This Recipe
- Cold Butter Magic: I swear by chilling that butter first—it makes the flaky layers sing. No food processor? No problem. Just rub it into the flour with your fingers until it resembles coarse crumbs, then fold in ice water. That crispy, buttery shatter when you cut into it? Pure reward.
- Sweet-Salt Balance: A pinch of sugar in the dough? Trust me, it’s not about sweetness—it’s about depth. That subtle caramel note when baked makes the crust taste like it’s been kissed by a pastry chef. And the kosher salt? It cuts through the richness like a perfect contrast.
- Weeknight Hero: This crust is my go-to for pot pies, hand pies, or even a quick galette. Roll it out once, fill it with whatever’s in your fridge (leftover chicken? Sautéed veggies?), and you’ve got dinner. No fancy plating, no stress—just solid, reliable flavor.
- Pantry Staple Power: Five ingredients, all of which you already own. Butter, flour, salt, sugar—this isn’t some specialty recipe begging for obscure ingredients. It’s the kind of crust that turns a basic dessert into something special without breaking the bank. (Yes, even when you’re feeding a crowd.)
Step-by-step instructions for a perfect 9½-Inch pie crust
Here's the method for a flawless crust that's sturdy enough for fillings yet tender enough to melt in your mouth.
👨🍳 Step 1: Combine Dry Ingredients with Cold Butter
In a large mixing bowl, whisk together the 2.25 cups all-purpose flour, 0.5 teaspoon Diamond Crystal kosher salt, 1 tablespoon granulated sugar, and 1 teaspoon white vinegar until evenly distributed. The vinegar might seem odd, but it's what creates that signature flakiness by tenderizing the gluten.
Add the 1 cup cold cubed unsalted butter (½-inch pieces) to the dry ingredients. Using your fingers or a pastry cutter, work the butter into the flour until you reach a texture resembling coarse crumbs with pea-sized butter pieces remaining. This ensures even distribution of fat for maximum flakiness. If the mixture feels too dry, chill it for 5-10 minutes before proceeding.
🥘 Step 2: Add Ice Water Gradually
Place the bowl over a sink and slowly drizzle in the 0.25 cup ice water (use frozen cubes for precision) while stirring with a fork. The ice water helps maintain cold temperatures and prevents gluten development. Mix just until the dough begins to come together—don't overwork it. You want to see moist clumps forming, but not a fully cohesive ball yet.
At this stage, the dough should hold together when pressed gently but still feel slightly crumbly. If it's too dry, add 1 teaspoon more ice water; if too sticky, sprinkle in 1 tablespoon more flour. The ideal consistency is like damp sand that holds together when squeezed but doesn't stick to your hands.
🔪 Step 3: Form and Chill the Dough
Turn the dough onto a lightly floured surface and gently press it into a 9½-inch circle using your hands and the base of a measuring cup. The edges should be slightly thicker than the center—this prevents shrinking during baking. Wrap the dough tightly in plastic wrap and refrigerate for at least 1 hour or up to 2 days. This resting period relaxes the gluten and firms up the fat for perfect flakiness.
I like to place the wrapped dough on a baking sheet before refrigerating—this makes transferring it to the rolling pin later much easier without stretching. The dough should feel firm but still cold to the touch when ready to roll. If it's too soft, return it to the fridge for another 15-20 minutes before proceeding.
🍳 Step 4: Roll and Transfer the Crust
On a lightly floured surface, roll the chilled dough from the center outward, rotating the dough as you go, until it reaches ⅛-inch thickness for the bottom crust or 1/16-inch thickness for a top crust. The rolling pin should be kept cold—either chill it in the freezer for 5 minutes between uses or dip it in ice water. This prevents the butter from melting too quickly.
Carefully transfer the rolled crust to a 9½-inch pie dish by gently lifting it with a rolling pin or pie dish. Trim the edges to ½-inch width, leaving the overhang for crimping later. If making a double crust, roll the second crust separately and transfer it to a parchment-lined baking sheet. Chill both crusts for 15 minutes before filling to maintain their shape.
⏰ Step 5: Pre-Bake for Stability (Optional but Recommended)
For fillings that require a pre-baked crust (like custards or fresh fruit), preheat your oven to 375°F and line the bottom crust with parchment paper or aluminum foil. Fill with pie weights or dried beans, then bake for 15 minutes. Remove the weights and bake 5-8 minutes more until lightly golden. Prick the bottom all over with a fork to prevent puffing when adding filling.
For unfilled crusts (like quiches), simply bake at 375°F for 12-15 minutes until the edges are light golden brown and the crust feels firm to the touch. This creates a sturdy base that won't sog under fillings. Always bake crusts before adding wet fillings—this prevents a gummy texture and ensures perfect texture in every bite.
Pro Tips For Making 9 1/2 Inch Pie Crust
- Chill the Butter First: Unsalted butter straight from the fridge is too hard to cut properly—take it out 20 minutes before measuring. Cold butter makes a flakier crust, but if it’s rock-solid, you’ll struggle to mix it into the flour. (I learned this after fighting with a butter block that refused to yield.)
- Use Ice Water—Really: Skip the tap water. Freeze water overnight in ice cube trays, then use those cubes directly in the recipe. The slow melt keeps the dough from getting gummy, and you won’t end up with a soggy mess. (Yes, even if you’re impatient like me.)
- Don’t Overwork the Dough: Once the butter and flour come together, stop mixing the second everything clumps. Over-handling develops gluten, which makes the crust tough instead of tender. Just press it into a disc, wrap it, and rest—no need to knead like bread dough.
- Weigh the Flour: Scooping flour from the bag packs it down, adding extra moisture and making the crust dense. Use a scale for the 9 1/2-inch crust—250 grams of all-purpose flour is the magic number. (I was skeptical until I tried it; the difference is noticeable.)
Health benefits of this recipe
Whole Grain Advantage
While this recipe uses all-purpose flour, swapping in ½ cup whole wheat flour for every 1 cup all-purpose adds fiber and nutrients without sacrificing flakiness. Whole wheat flour provides 4 grams of fiber per ¼ cup, supporting digestion and heart health.
I've tested this substitution with King Arthur whole wheat flour, which blends seamlessly and yields a slightly nuttier flavor that pairs beautifully with fruit fillings. 🌾
Low-Fat Flexibility
For a lighter crust, replace ½ cup butter with ½ cup vegetable shortening or ½ cup coconut oil (solid). Shortening creates a more tender texture with less fat, while coconut oil adds subtle sweetness that complements desserts.
These alternatives reduce saturated fat by about 30% per serving while maintaining structure. I recommend Crisco shortening for consistent results—it's neutral in flavor and holds up well during baking.
Gluten-Free Option
A gluten-free version is absolutely possible using a 1:1 gluten-free flour blend like Bob's Red Mill 1-to-1. Add ½ teaspoon xanthan gum to improve binding, and increase ice water by 1 tablespoon since gluten-free flours absorb moisture differently.
The texture will be slightly denser but still flaky. I've found this works best with 1 extra tablespoon of cold butter to compensate for the lack of gluten structure.
Lower Sugar Impact
Cutting the sugar in half (½ tablespoon) reduces calories by 20 per serving while still yielding a tender crust. For added flavor without sugar, mix ½ teaspoon cinnamon or ¼ teaspoon vanilla extract into the dry ingredients.
These alternatives enhance sweetness perception naturally. I've also had success using 1 tablespoon honey instead of sugar—it adds moisture and subtle floral notes that complement fruit fillings perfectly.
Savory Adaptations
Transform this crust into a savory base by omitting the sugar and adding 1 tablespoon fresh herbs (like thyme or rosemary) or ½ teaspoon garlic powder. For extra richness, replace 2 tablespoons butter with 2 tablespoons grated Parmesan cheese.
This version works beautifully for quiches or savory tarts. The herbs infuse the butter during baking, creating complex layers of flavor that elevate any savory filling. 🧀
Nutrition facts
Frequently asked questions
Why is keeping the butter cold so important?
Cold butter creates the signature flaky layers in pie crusts. When melted butter cooks, it releases steam that separates the dough layers, creating those beautiful flakes. If your butter softens, pop the dough back in the fridge for 10 minutes to restore firmness. This is why we use ice water and chill everything thoroughly!
Can I make this crust ahead of time?
This dough keeps perfectly in the fridge for 3 days wrapped tightly in plastic. For longer storage, freeze it between parchment paper for up to 3 months. Let it thaw in the fridge overnight before rolling - never at room temperature to prevent butter from melting.
What's the best way to prevent a soggy bottom?
Pre-bake your crust for 12-15 minutes at 375°F before adding any wet fillings. Line with parchment and add pie weights or dried beans to prevent puffing. For custard fillings, pre-bake for 15 minutes with weights, then remove them and bake 5-8 minutes more to get that perfect golden edge.
How do I fix a cracked crust?
If cracks appear during baking, simply brush them with a little extra egg wash (1 egg + 1 tbsp water) after removing from oven. The egg will help seal the cracks while adding shine. For prevention, keep your dough well-chilled and handle it gently when rolling - don't press too hard!
Can I use this crust for savory dishes?
Yes! For savory applications, omit the sugar and add 1 tbsp fresh herbs or ½ tsp garlic powder to the dry ingredients. Replace 2 tbsp butter with 2 tbsp grated Parmesan cheese for extra richness. This works beautifully for quiches or savory tarts while maintaining that perfect flaky texture.